lets presume a few things at the point that you have taken your router out of the box and you have plugged it in connected your PC and connected it to your internet connection.

The Starting Point
If you have not downloaded winbox you want to do it now, this tool is increadibly powerful and will make configuring a router very easily indeed but we will be starting with scripting because It is important to know both ways but doing it by commandline gives you personally a better understanding on how it all works.
The network design
Firstly our network design or layout due to its complexity I have do it in crayon..
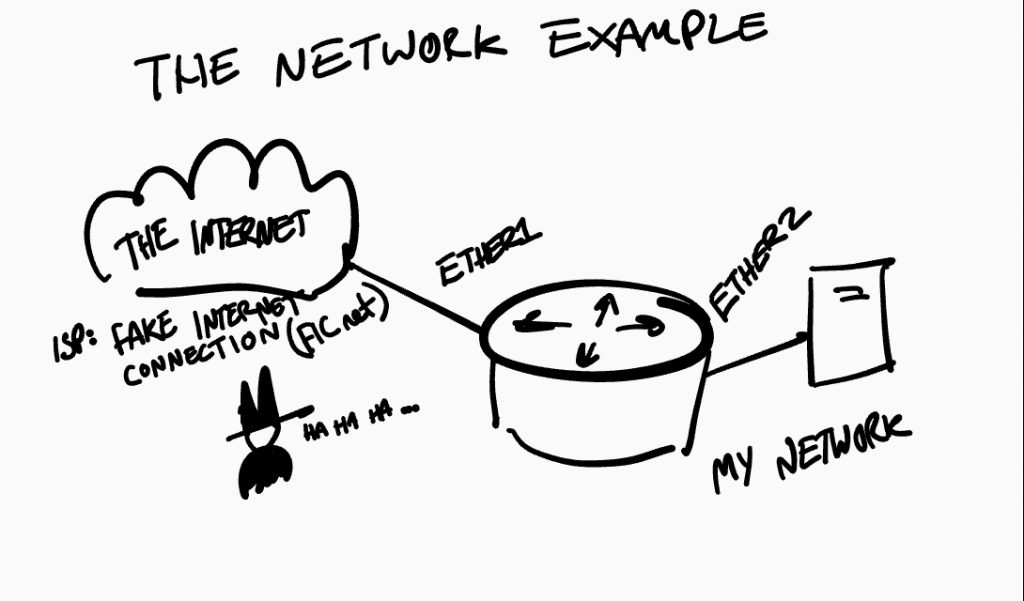
I didn’t say it was going to be amazing but let’s give you the run down. Our router has ethernet cables plugged into ether1 for the Internet and ether2 for all our stuff maybe a switch or computer or any network equipment requiring a Internet connection.
like I said, a very basic network configuration.
The terminal
Welcome to the terminal via telnet. If you have no experience in using Telnet check out our guide on using Putty let’s presume you have some knowledge of putty and you have been able open putty up selected Telnet and punched in the default gateway IP address for Mikrotik RouterOS. Just so you know this IP is 192.168.88.1 you may as well remember this one you may find your self using it a lot.
When you Telnet or use SSH you will be requested to put in a username and password. Out of the box the username is admin and the password is blank not the word blank just blank anyway.. Usually there are a few rules already set ready to rock and roll like some basic firewall filters and a NAT rule ready configured a local IP address and dhcp server to get you started. This means we can easily do a very basic setup to get you up and running so let’s begin.
What you are seeing is something like this.[admin@Mikrotik] >
let’s try adding an IP address to a interface first we need to go to ip and then addres
Tip: One very handy if you want to find something try pressing tab on your keyboard and it will list all the available functions.
[admin@Mikrotik] > ip
[admin@Mikrotik] > /ip address hit the enter key and you should get something like below
[admin@Mikrotik] ip address> this means you are under the IP address section. You can think of it as folders or containers being the best way to describe it.
Tip: To get back to the main menu type a "/" and hit enter on the keyboard and boom! you are back at the start! Or if you want to go back a level then try "..". But for practicing I would recommend always typing out the full path until you have memorised most of the structure.
functions available for addresses (ip address)
- add very simply this is for adding an IP address to a interface.
- you have a few options related to adding ip address
- broadcast
- copy-from
- net mask
- comment
- address
- this is the address you want and subnet for example 10.0.0.1/24 this notation is both the ip address and the subnet size known as a subnet bit.
- disabled
- network
- Interface
- The interface is fairly descriptive it’s the port you want the IP address to be associated with this can be a vlan, ethernet port or fiberoptic so on and so on even virtual ports or bridge port.
- you have a few options related to adding ip address
- comment add a comment to an existing IP address.
- disable disable an IP address on the list.
- edit this option enables you to change specific parts using a built in text editor.
- enable to enable an IP address
- export this feature is quite handy to say the least we go into exporting in more detail but you can export the IP list as a command set to import on another device.
- find as you should have guessed by now, yep it helps find and in this case an IP address which is handy if you have a massive list of IP’s addresses attached to loads of different interfaces.
- print
- personally this is your friend, this function is used everywhere on everything to list out what’s being used it also gives you a few options
- append
- Count-only
- returns the amount of items to list.
- File
- handy feature you can export the information returned this is useful if you plan on having an email setup to email you a summary of settings.
- Follow-only
- Interval
- without-paging
- Brief
- seems return the same as just print or atleast while printing
ip addresstable/list
- seems return the same as just print or atleast while printing
- detail
- shows all the details of the listed items so any settings that are not required for the object to function.
- Follow
- From
- Where
- personally this is your friend, this function is used everywhere on everything to list out what’s being used it also gives you a few options
- remove
- quite simply removes the item,
- You can remove an item by first printing the list out and getting the position ID (this can be found on the far left when you use the print command.
- set
- The set function is handy when you just want to quickly change something and to do so you need to print the list first get the id you want to edit and then
Just some background add, comment, export, print, edit, set, disable and remove are fairly generic across the different functions / containers / folders with some different sub functions but generally this is the case.
let’s get configuring
you’re connected and you can this you have selected ip address. Now let’s get our router working on a fake Internet connection! I mean our ISP called Fake Internet Connection (FICnet for short) let’s say our ISP have given us an IP to connect to manually. Now this is not a common practice but smaller ISPs may do it but most (if not all) would do it via DHCP or some form of ppp.
But for this example the ISP have given you an;
IP address of 10.234.67.2/30 with a gateway of 10.234.67.1 and some DNS addresses of 10.69.69.69, 10.69.69.70
If you want to have a play with subnets and want a calculator try our subnet calculator . I will bet some of you guys are going to be like we’ll these IP are private IP address spacing. I know and even O2 and most mobile operators use private address spacing and NAT it to save on ip address spacing oh and this is an example.
[admin@Mikrotik]/ip address>
[admin@Mikrotik]/ip address> add address=10.234.67.2/30 interface=ether1
Congratulations! You have added an IP address to a interface well done! Now I bet your going to rush to ping some Internet address or domain right? Well give it a try! And yes it’s not going to work.. why you ask? Simple we have not told the router of our default route to the outside world at the moment would could ping the gateway but nothing else.
To ping use the follow command
[admin@Mikrotik] > /ping address=10.234.67.1
This will ping the router of our ISP (Fake Internet Connection) but if you tried another IP address
Let’s take a look at the routes table.
[admin@Mikrotik] > ip route
functions available for route (ip route)
- cache:
- nexthop:
- rule:
- vrf:
- add:
- check:
- comment:
- disable:
- edit:
- enable:
- export:
- find:
- print: prints out the ip routes table and returns routes and gateways available.
- remove:
- set: Set a specific setting via its list id you get get it from the print command or by a search string.
- Example:
[admin@Mikrotik] > ip route set 0 gateway 10.234.67.1this would set the the first route with a gateway WARNING don’t do it unless you know what you about to change use print to list all the available routes to change.
- Example:
- unset:
Tip: always backup your configuration one trick is use safe mode this can save your bacon in so many ways it could also save you bricking your configuration or your router requiring a hard reset.